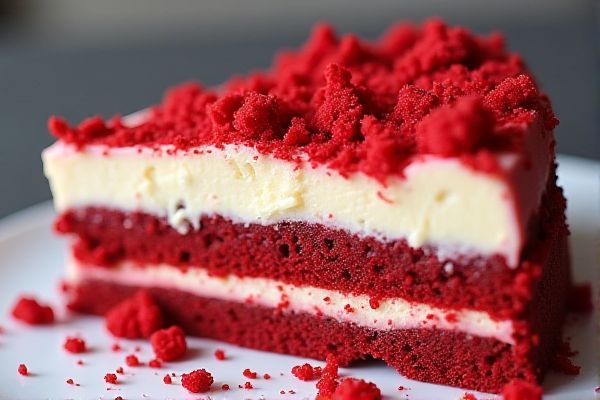
Red Velvet Cheesecake Cake from Milk Bar features moist red velvet cake layers filled with smooth cream cheese frosting, topped with a velvety cheesecake layer and vibrant red cake crumbs, delivering a rich and visually stunning dessert experience.
Equipments
- Mixing bowls
- Electric mixer or stand mixer
- Whisk
- Rubber spatula
- Measuring cups
- Measuring spoons
- 8-inch cake pans (2 or 3, depending on layers)
- Springform pan (for cheesecake layer)
- Parchment paper
- Wire cooling rack
- Offset spatula
- Serrated knife (for leveling cakes)
- Baking sheet (for cake crumbs)
- Food processor (optional, for fine crumbs)
- Cooling rack
- Cake turntable (optional, for assembly)
- Icing smoother or bench scraper (optional)
- Plastic wrap or aluminum foil (for chilling)
Ingredients
- For Red Velvet Cake Layers:
- 2 1/2 cups (310g) all-purpose flour
- 1 1/2 cups (300g) granulated sugar
- 1 teaspoon baking soda
- 1 teaspoon fine sea salt
- 1 teaspoon unsweetened cocoa powder
- 1 1/2 cups (360ml) vegetable oil
- 1 cup (240ml) buttermilk, at room temperature
- 2 large eggs, at room temperature
- 2 tablespoons (30ml) red food coloring
- 1 teaspoon vanilla extract
- 1 teaspoon white vinegar
- For Cheesecake Layer:
- 16 oz (450g) cream cheese, softened
- 1/2 cup (100g) granulated sugar
- 2 large eggs
- 1/4 cup (60ml) sour cream
- 1 teaspoon vanilla extract
- For Cream Cheese Frosting:
- 12 oz (340g) cream cheese, softened
- 6 tablespoons (85g) unsalted butter, softened
- 3 cups (360g) powdered sugar
- 1 teaspoon vanilla extract
- For Red Velvet Cake Crumbs:
- Reserved cake scraps from leveling/red velvet cake layers
- For Assembly:
- Optional: milk (for brushing layers)
- Optional: sprinkles (for decoration)
Ensure all dairy ingredients like cream cheese, buttermilk, and eggs are at room temperature to achieve a smooth, well-incorporated batter and frosting. Measure your flour precisely by spooning it into the measuring cup and leveling it off to prevent a dense cake texture. Using red food coloring is essential to get the signature vibrant hue of the red velvet layers, but adjust the amount according to your desired intensity. For the cheesecake layer, soften the cream cheese thoroughly to avoid lumps and achieve a creamy consistency. Your Red Velvet Cheesecake Cake from Milk Bar copycat menu will shine with properly prepared layers and a luscious frosting that mirrors the original's richness and visual appeal.
Instructions
- Instructions:
- Preheat oven to 350°F (175°C). Line cake pans and springform pan with parchment paper and grease.
- Prepare Red Velvet Cake: In a large bowl, whisk flour, sugar, baking soda, salt, and cocoa powder.
- In another bowl, whisk oil, buttermilk, eggs, food coloring, vanilla, and vinegar.
- Gradually add wet ingredients to dry, mixing until smooth.
- Divide batter evenly between cake pans.
- Bake red velvet layers 25–30 minutes, until a toothpick comes out clean.
- Cool cakes in pans for 10 minutes, then turn onto wire rack to cool completely.
- Prepare Cheesecake Layer: Beat cream cheese and sugar until smooth.
- Add eggs one at a time, mixing well.
- Add sour cream and vanilla; mix until smooth.
- Pour cheesecake batter into prepared springform pan.
- Bake 30–35 minutes at 325°F (160°C), until set but slightly wobbly in center.
- Cool completely in pan, then chill until firm.
- Prepare Cream Cheese Frosting: Beat cream cheese and butter until smooth.
- Add vanilla; gradually add powdered sugar, beating until fluffy.
- Level red velvet cakes with serrated knife; reserve scraps for crumbs.
- Make Red Velvet Cake Crumbs: Tear or process cake scraps into fine crumbs.
- Optional: Toast crumbs on baking sheet for 8–10 minutes at 300°F (150°C) for crunch.
- Assemble Cake: Place first red velvet layer on serving plate or turntable.
- Brush with milk if desired.
- Spread thin layer of cream cheese frosting.
- Gently set cheesecake layer on top, remove pan and parchment.
- Spread thin layer of cream cheese frosting over cheesecake.
- Top with second red velvet cake layer.
- Frost entire cake with remaining cream cheese frosting; smooth with offset spatula or icing smoother.
- Press red velvet cake crumbs onto sides and top for decoration.
- Optional: Decorate with sprinkles.
- Chill cake at least 1 hour before slicing.
- Slice with a clean, sharp knife, wiping between cuts for neat servings.
Substitution
The Red Velvet Cheesecake Cake from Milk Bar copycat menu combines classic red velvet cake layers with a creamy cheesecake center, creating a luxurious texture and flavor contrast. If you don't have buttermilk on hand, you can substitute it by mixing 1 cup of milk with 1 tablespoon of lemon juice or white vinegar, letting it sit for 5 minutes before use. When cream cheese is not available, mascarpone or ricotta can be used as alternatives in the cheesecake and frosting, but note they may alter the final texture slightly. Your baking success depends on accurate measuring, so weigh ingredients where possible, and consider lining pans with parchment paper for easy removal. Cake crumbs used for decoration can be finely processed in a food processor or manually crumbled for a rustic finish.
Tips
Ensure all dairy ingredients like cream cheese and buttermilk are at room temperature before mixing to achieve a smooth batter and frosting texture. When baking red velvet layers, avoid opening the oven door early to prevent sinking, and use a toothpick test to confirm doneness. Leveling the cake layers with a serrated knife allows for even stacking and a professional look, while reserved cake crumbs add an appealing finish when pressed onto the frosted cake. You'll get cleaner slices by chilling the assembled cake thoroughly and wiping the knife between cuts.
Nutritions
Red Velvet Cheesecake Cake combines rich sources of fat and protein primarily from cream cheese and butter, contributing to a creamy texture and indulgent flavor. The all-purpose flour and sugar provide carbohydrates, offering quick energy, while buttermilk adds subtle nutrients like calcium and vitamin B12. This cake is relatively high in calories and saturated fat, so enjoy your slice in moderation within a balanced diet. Your indulgence also includes antioxidants from cocoa powder and potential vitamins from eggs integrated in the recipe.
Storage
Store Your Red Velvet Cheesecake Cake in an airtight container to preserve its moisture and prevent it from absorbing odors from other foods. Refrigerate promptly after serving to maintain the smooth texture of the cream cheese frosting and the velvety cheesecake layer, ideally within 2-3 days. For longer storage, wrap the cake securely in plastic wrap and aluminum foil, then freeze for up to 1 month, thawing overnight in the refrigerator before serving.
Variation or Alternatives
For a dairy-free version of this Red Velvet Cheesecake Cake, substitute coconut cream for the cream cheese in both the cheesecake layer and frosting, ensuring you use full-fat coconut cream for a rich texture. You can replace buttermilk with a mixture of almond milk and a tablespoon of lemon juice to mimic the acidity needed for the red velvet cake layers. When baking the cheesecake layer, consider a water bath to enhance moisture and prevent cracking, providing a smoother finish. Your cake will still achieve that vibrant red color and creamy consistency with these thoughtful substitutions.
Allergies
This dessert contains common allergens including dairy from cream cheese, butter, and buttermilk, as well as eggs present in both the cake and cheesecake layers. The all-purpose flour contains gluten, which may affect individuals with gluten intolerance or celiac disease. If you have allergies to any of these ingredients, it is important to avoid consuming this Red Velvet Cheesecake Cake to prevent adverse reactions.
Why this recipe?
Red Velvet Cheesecake Cake from Milk Bar restaurant is beloved for its unique fusion of moist red velvet layers combined with creamy cheesecake filling, creating a rich and indulgent flavor profile. Its signature balance of tangy cream cheese and subtle cocoa notes makes it a standout dessert among cake enthusiasts. You'll appreciate the textural contrast and vibrant color, which elevate both taste and presentation. Trying to make a copycat version allows you to recreate this iconic treat at home, enjoying its luxurious taste while customizing sweetness and ingredients to your preference.